Pixion’s Goals and Architectural Design
Hello Pixioneers! It’s time to dive into the functionality and architecture I’ve selected for my little Pixion project. As mentioned in the previous article, the goal of this DIY endeavor is to develop a prototype home console with the following requirements:
Must Have:
- Display Capability: Output images to a screen with a resolution of 640×480 at 60 Hz, using 8 bits per color channel. I plan to use double buffering for smooth screen rendering.
- User Input: Receive input from a custom-made controller.
- Sound Generation: Produce sound and output it through a loudspeaker. The method, whether using an audio decoder or signal generation, is still to be determined.
- External Game Loading: Play games from an external cartridge to avoid flashing the MCU from a computer each time a game is changed. Similar to what a real home console would do. Whether it should load actual C code from the cartridge or interpret a scripting language is still to be decided.
Nice to Have:
- Light 3D Rendering: Capability to render simple 3D graphics, such as wireframe meshes, would be an interesting feature to explore.
Architectural Considerations:
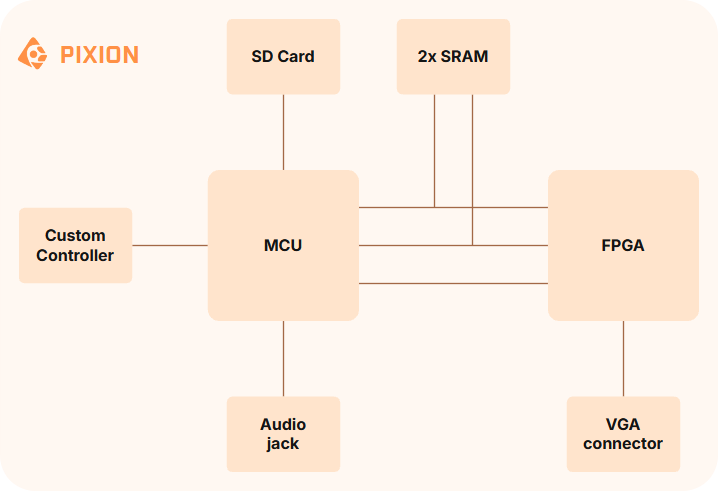
Based on these requirements, I’ve come up with the following architecture:
- VGA interface: The display interface will be handled via VGA, which is a relatively simple protocol compared to HDMI or more recent ones.
- FPGA: To achieve a decent resolution without putting too much strain on the MCU, I will use a dedicated FPGA for VGA generation. I might also use the FPGA for some dedicated processing to offload the MCU, like handling 3D rendering. So the FPGA would be seen as our tiny GPU!
- MCU: The game logic will be managed by the MCU, which will also be responsible for creating the screen render. This requires transferring the screen image from the MCU to the FPGA, which will be done using SRAM.
- SRAM: It will be used to store the screen image generated by the MCU before the FPGA outputs it to the VGA port. I’ve decided to use two separate SRAM chips to simplify sharing between the MCU and the FPGA, enabling double buffering.
- SD card: Finally, the cartridge will be implemented with a simple SD card, which will facilitate game development on a computer.
This architecture is a work in progress and will likely evolve in the coming days as I delve deeper into the project. The aim is to balance functionality with simplicity, ensuring an educational and fun experience.
Stick around for more adventures, and see you in the next posts, where we’ll start diving into each sub-block of the project!
Pixer